Subscriptions & Cross Platform
RainAware supports full cross-platform syncing across Android, iOS, and macOS for all subscribers. Additionally, Annual subscribers receive a complimentary Windows version of the app!
1. Enabling Cross-Platform Access
To use your subscription on multiple devices, it must be linked to an account.
- If you have not subscribed yet: Choose Option 1: Use On All Your Devices and "Sign in with Apple" or "Sign in with Google", then purchase your monthly or annual subscription.
- If you are already a subscriber (but chose Option 2): Your subscription is currently tied only to your current device. You must go to your account settings and choose Link with Apple or Link with Google to register your account.
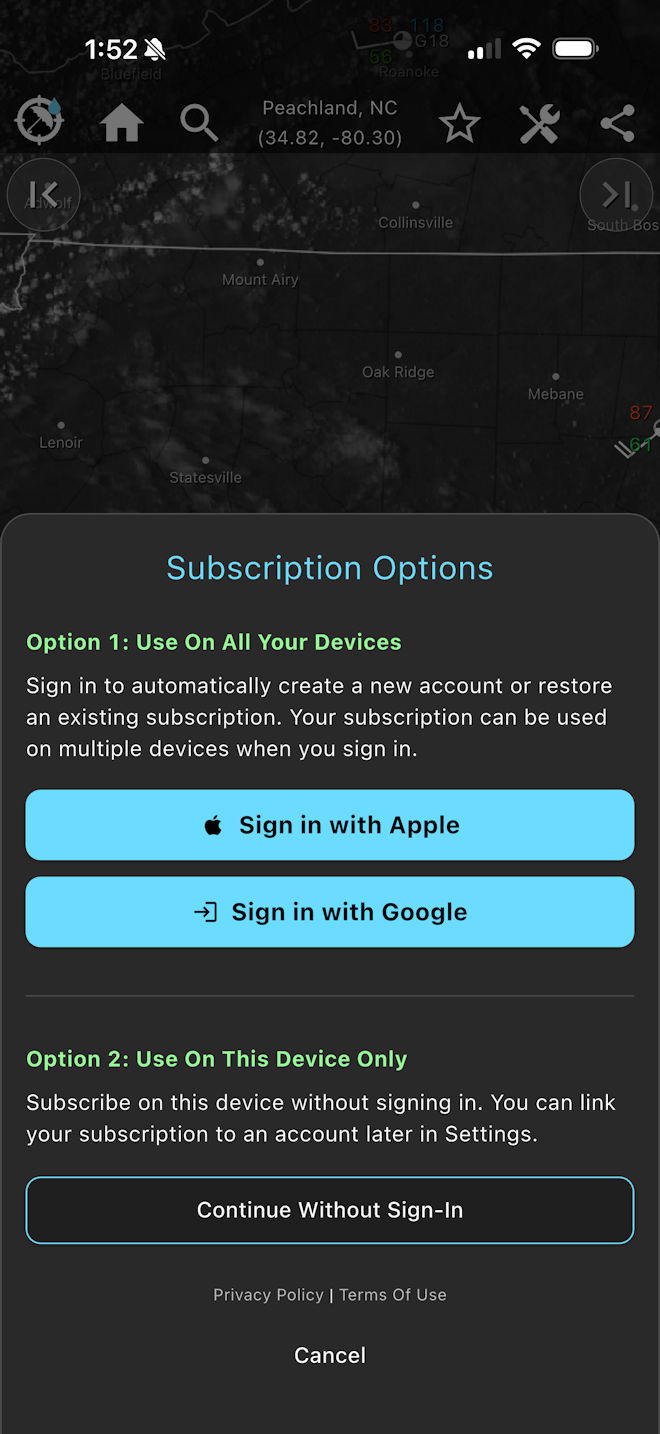 New Subs: Choose Option 1
 Existing Subs: Link your account
2. Activating the Windows App (Annual Only)
Once your Annual subscription is linked to an account, the Windows App Options button will appear under Account Information. Tap it to request the installer package via email. After installing, open the Windows app to generate a 6-digit code, and enter it into your mobile app to activate.
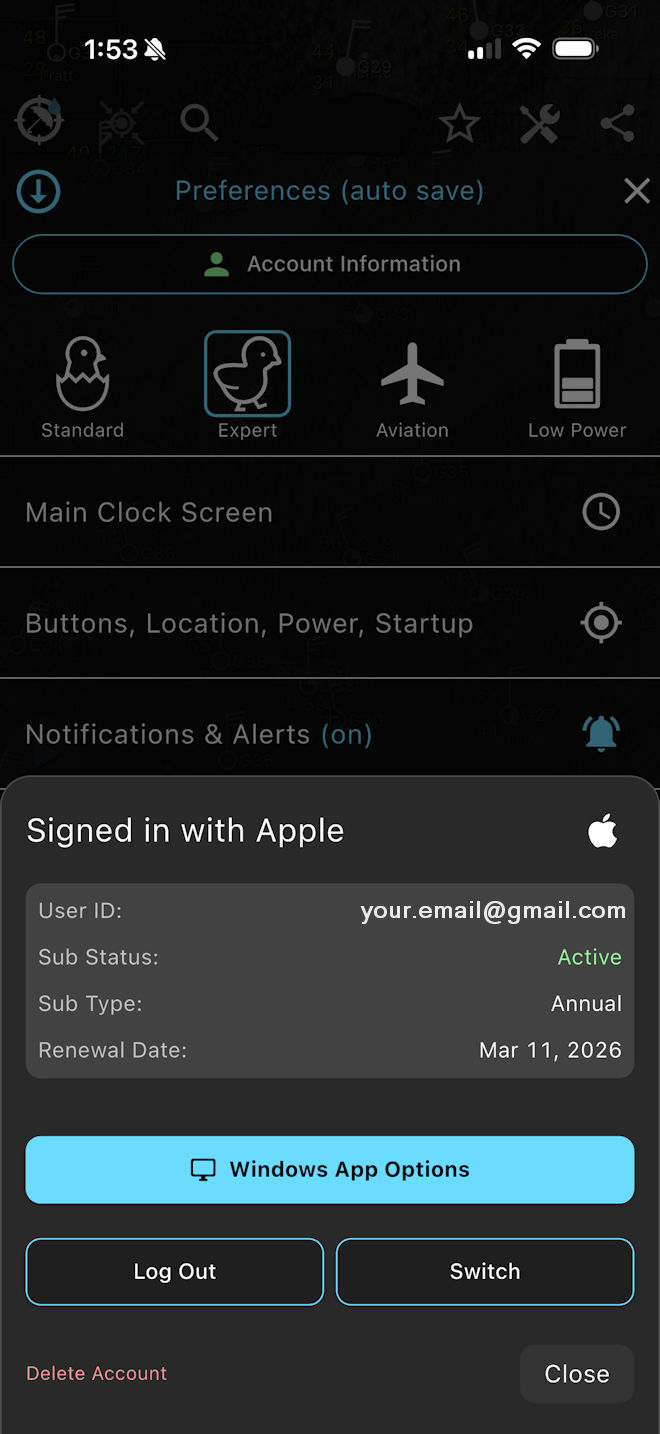 1. Tap Windows App Options
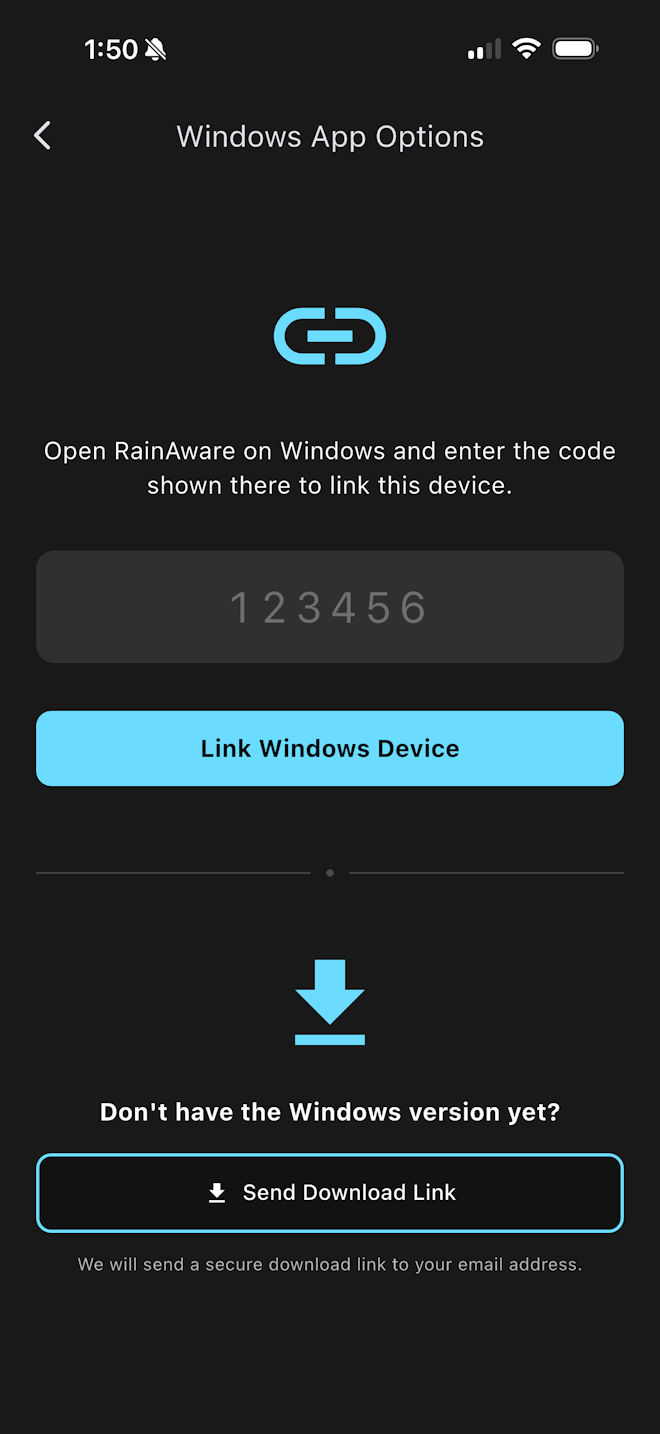 2. Enter the code from your PC
Notifications & Alerts
Upon installation, you must enable the alerting function. Tap the Settings icon at the bottom of the screen, then choose "Notifications & Alerts" and enable permissions when asked. Now you will receive notifications based on your criteria.
Tip: Too Many Alerts? Increase Alert Frequency toward "Rare" levels or turn some of them off.
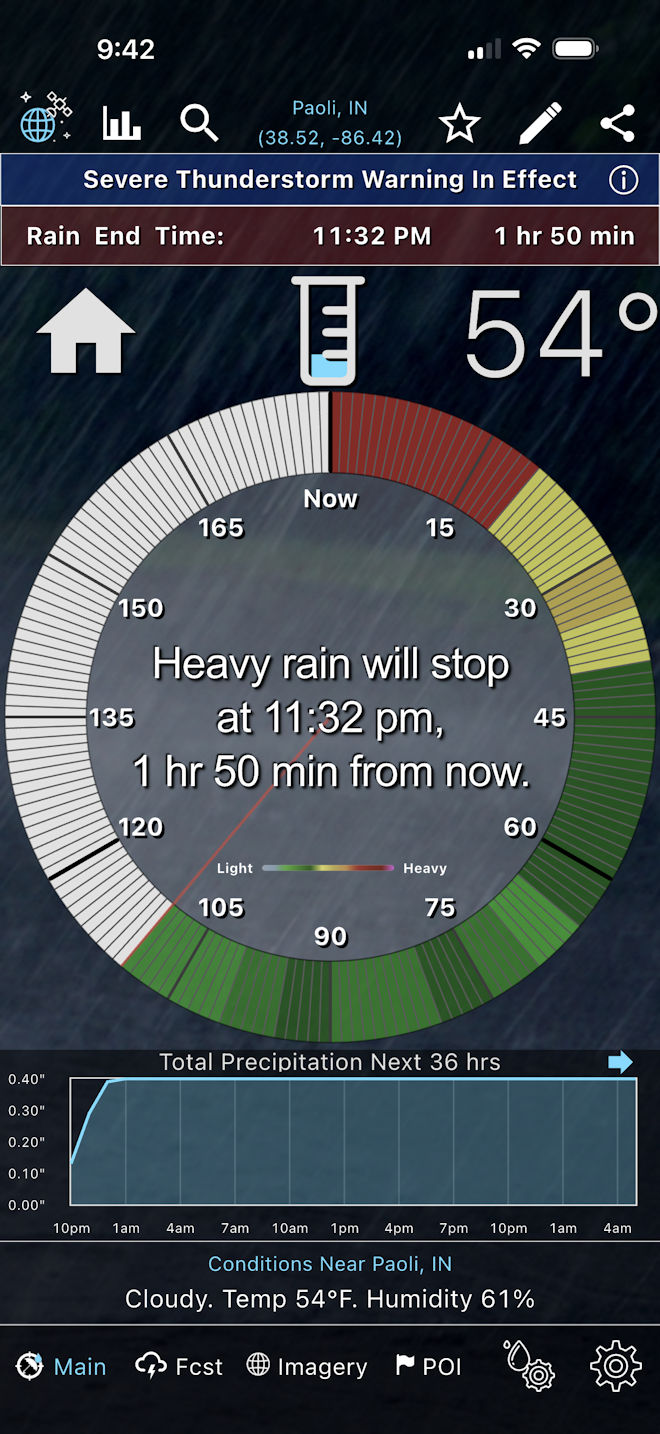
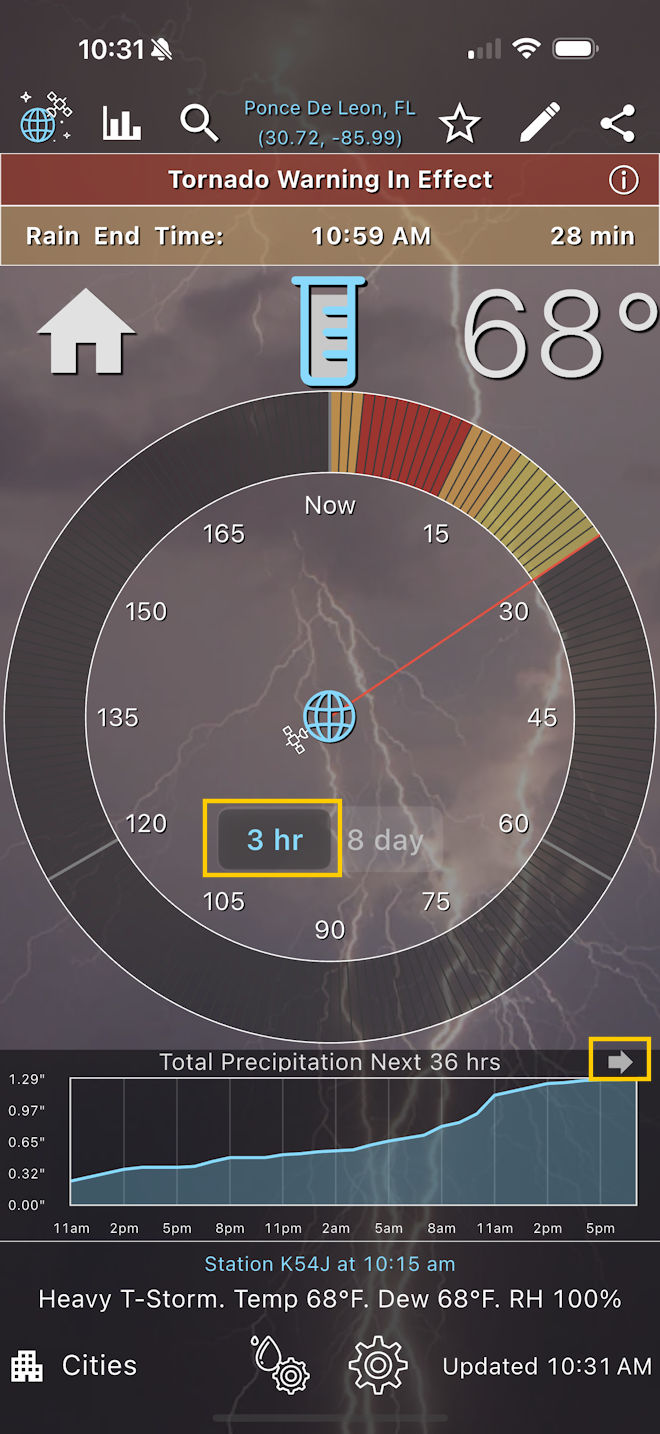
Main Screen (RainClock) Gestures & Shortcuts
Setting: If you prefer to ALWAYS see one clock or the other (Rain vs Forecast), go to Settings > Buttons..., and choose "Weathermap & Clock At Startup." Then flip the first switch.
Tip: Move the clock hand for a readout. You can also long press either of the buttons to reveal a "sleek switch", if you prefer.
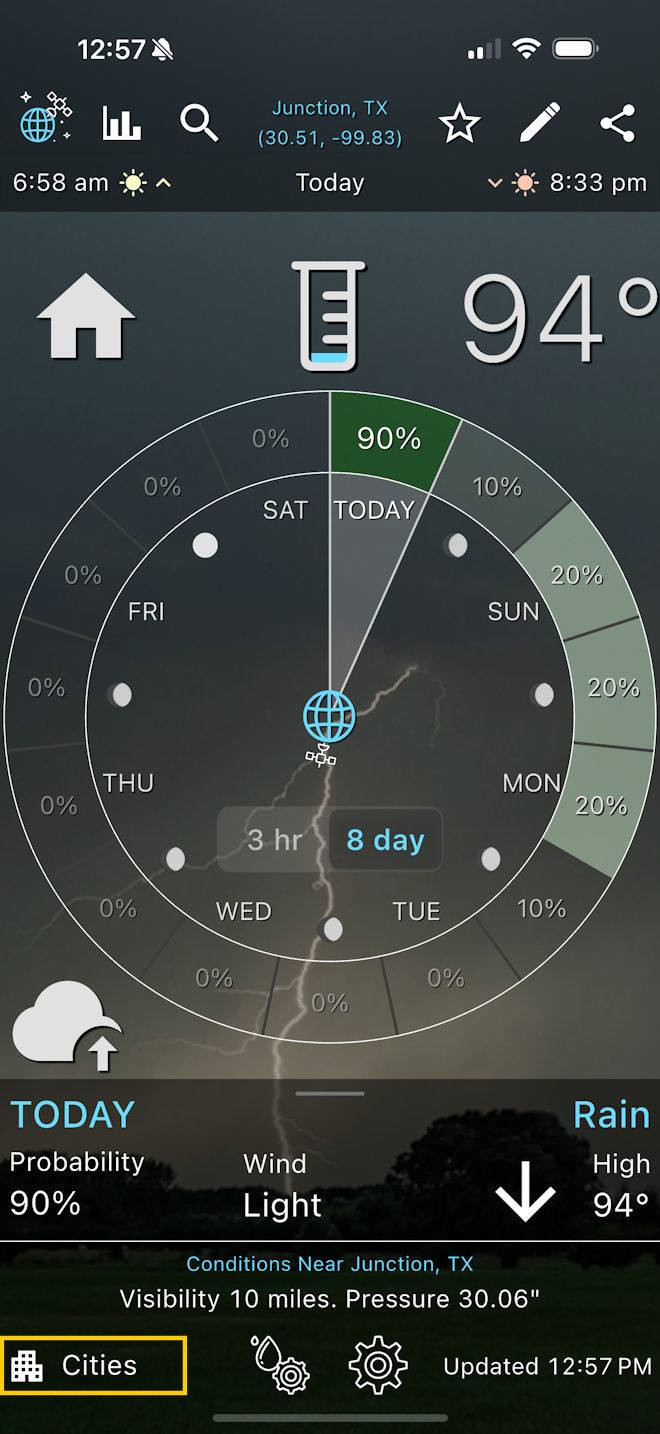
Forecast Bar and 36-hr Mini Graphs: On the main clock screen, tap the temperature badge to toggle the forecast bar to graph mode. Swipe your finger across the graph to obtain a data readout.
Badges (new): Aside from the temperature badge (always present in upper-right), additional badges will show up around the outside of the RainClock (top-center, upper-left, lower left, lower right). These badges only show when SIGNIFICANT weather changes are forecast in the next 3 hours, including:
- Rapid changes in wind speed.
- Major temperature swings.
- Significant changes in cloud cover.
The rain gauge badge is a bit different, and indicates significant precipitation accumulating over the next 36 hours.
Nearest Weather Observation Ticker: To pause the ticker, long press on the ticker bar to pause cycling. If you see a "nearest" icon (Rain, Lightning, Report), tapping the icon will navigate the app to that interesting area.
Background Pictures: Not just for decoration, RainAware attempts to match the weather outside to an assortment of roughly 40 weather situations.
Local vs UTC Timestamp: If in Standard mode, long press the timestamp to toggle between local and UTC time. If in Expert mode, simply tap.
Weather Map Gestures & Shortcuts
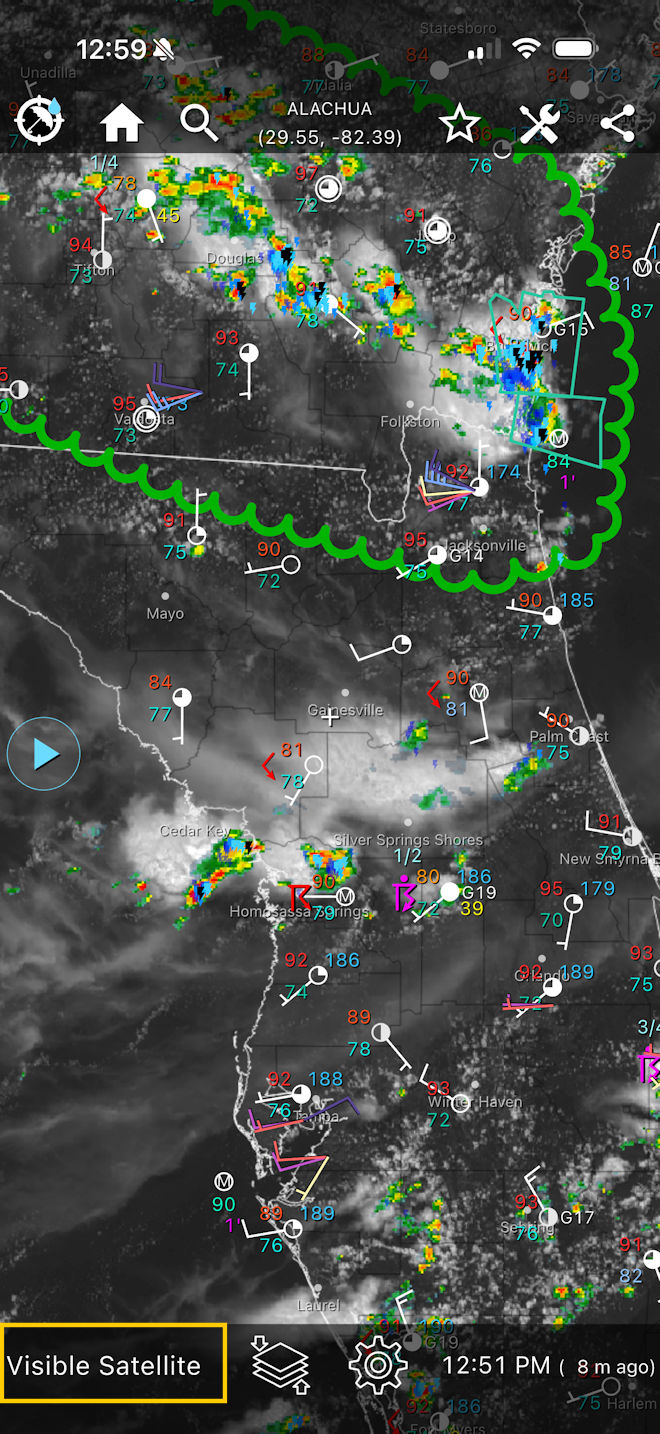
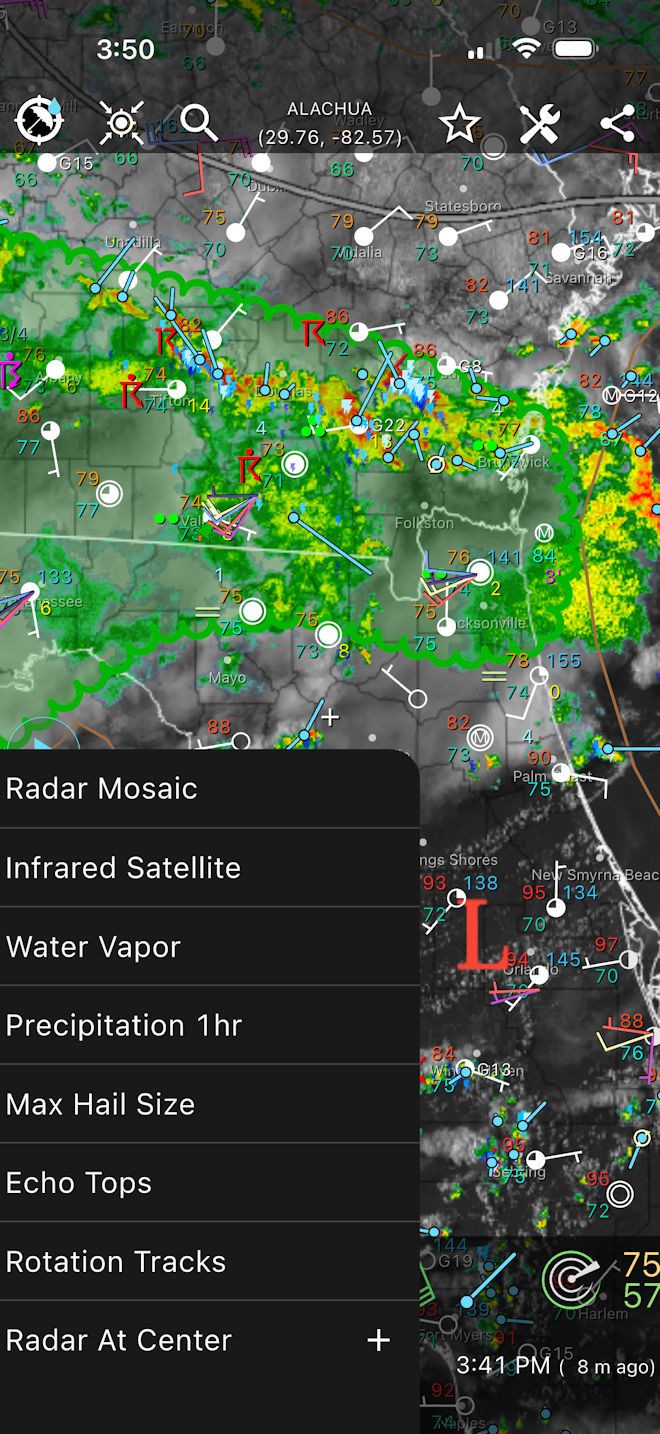
Change Imagery (Radar, Satellite, etc): Tap the image text at the lower left to reveal the full list.
Shortcut: Long press the |< or >| buttons toward the top of the screen to cycle through image types without using the menu.
Temporary Turbo Loop: Long press the > or < buttons for a burst of animation speed.
Permanent Turbo: Long press the "play" button. A fire icon appears, indicating that when pressed, turbo looping will occur. Note: Prolonged turbo looping will use more power.
Fullscreen Map: While viewing the map in portrait orientation, long press the "map centering" icon in the upper left (the button next to the RainAware icon) to reveal the fullscreen icon. When in fullscreen mode, the exit button will be in the lower-left corner.
Tip: If you feel the fullscreen exit button is too obtrusive, long press it to change the opacity.
Change Locator Readout: At the top center of the screen is the locator, which depicts the location of the screen center (+ icon). Tapping the locator at the top center will toggle through Nearest City > County > Nearest Weather Observation.
Temporarily Hide Center + Icon: Simply long press the locator at the top center to hide the map center icon.
Show/Hide Map Overlays: Long press the layers toggle button, bottom center of the screen.
Show/Hide Radar Background Map: While viewing a radar image, long-press on the lower-left menu (e.g., "Radar Mosaic"). This will show a solid gray background.
Colorized Visible/Daytime Imagery: While viewing Visible Imagery (Clouds Day), long-press the image name in lower-left menu. Or, tap to expand the menu, then tap the palette icon. This will add color to high clouds tops. Long press again to turn off.
Filter Storm Cells: Long press the blue storm track icon in the overlays tray. Filtered means only showing cells with hail or rotation, while unfiltered will show even small cells (can be noisy). Storm cells are filtered by default.
Change Surface Plot Size: Long press the surface observation icon in the overlays tray (e.g., 75/57). This will cycle through various sizes. Smaller plots will show more stations without zooming in.
Toggle Lightning Blinking: Long press the lightning icon in the overlays tray.
Toggle Off Non-Critical Advisories: By default, the blue triangle shows all watches, warnings, and advisories, typically county outlined areas. Long pressing the blue triangle will hide all but critical warnings. The triangle will then be orange.
Favorites / Location List
Setting Favorite Locations
- While in map mode, long-press anywhere on the map to drop a pin. Then, tap the "Star" to add.
- While in map mode, move the map so the center + is over the location you want to add. Then, long press the "Star" icon at the top of the screen.
- Tap the search icon at the top of the screen. Then, type the desired location. If it appears, tap "Add To Favorites" directly from that menu. Very small towns may not be listed currently.
Editing Favorites
- Open the favorites menu by tapping the "Star" at top right (in portrait mode).
- In the popup menu, tap the pencil to the left of the name to rename the location.
- Tap the RainAware logo on the right to "Go" to that location.
- Swipe the location left to remove.
Tip: If you see the "Home" icon on your main RainClock screen, it means the app is "at" another location. Similarly, the locator at the top of the screen will have a different font color. Tap the home icon to return to base.
Locator Readout
At top center of screen, you will see your location name including latitude & longitude.
- In Clock Mode, it shows your current (or browsed to) position.
- In Map Mode, it shows the CENTER POSITION of the map (at + symbol).
Note: If the locator text is blue, it indicates the app is at a browsed location. Tap "home" icon to return to using your device location.
If the locator text is yellow, it indicates you have manually set your "home" location, in which case, no "home" icon will appear.
Tip: Tap the locator area to toggle between nearest City, County, or Surface Station. You can set your preference in Settings > Buttons... > Map Readouts.
Settings
Tap the "gear" icon at the bottom. This may seem overwhelming at first, but in the end, you'll have a highly customized app. Please contact us via email from within the app (tap Settings, then scroll to bottom and tap "Contact") if you need assistance.
Saving Settings: Map settings made from within the Settings menu are "remembered", while changes made by tapping toggles and tray icons are only for the session.
Example: You are viewing Radar, and toggle surface observations to off. That change will not be remembered next time you start the app, unless you turn them off in Settings > Radar Image Defaults.
Per-Image Settings: Map overlay preferences are saved on a "per image type" basis, meaning when you switch imagery, it will recall what you had on that particular view (satellite vs radar and so on).
Misc
Exiting/Closing App (Android)
RainAware runs in edge-to-edge mode. To reveal the navigation bar and exit, you can:
- Tap the "Door" icon at top right (if dumptruck is there, tap that first).
- Swipe up from the very bottom of the screen.
Tablets and Computers
The best part! Run RainAware on a tablet, macOS or Windows, or, cast to a big screen and behold a larger weather map. Perfect for monitoring weather across a large area.
 IF PRECIPITATION NEAR:
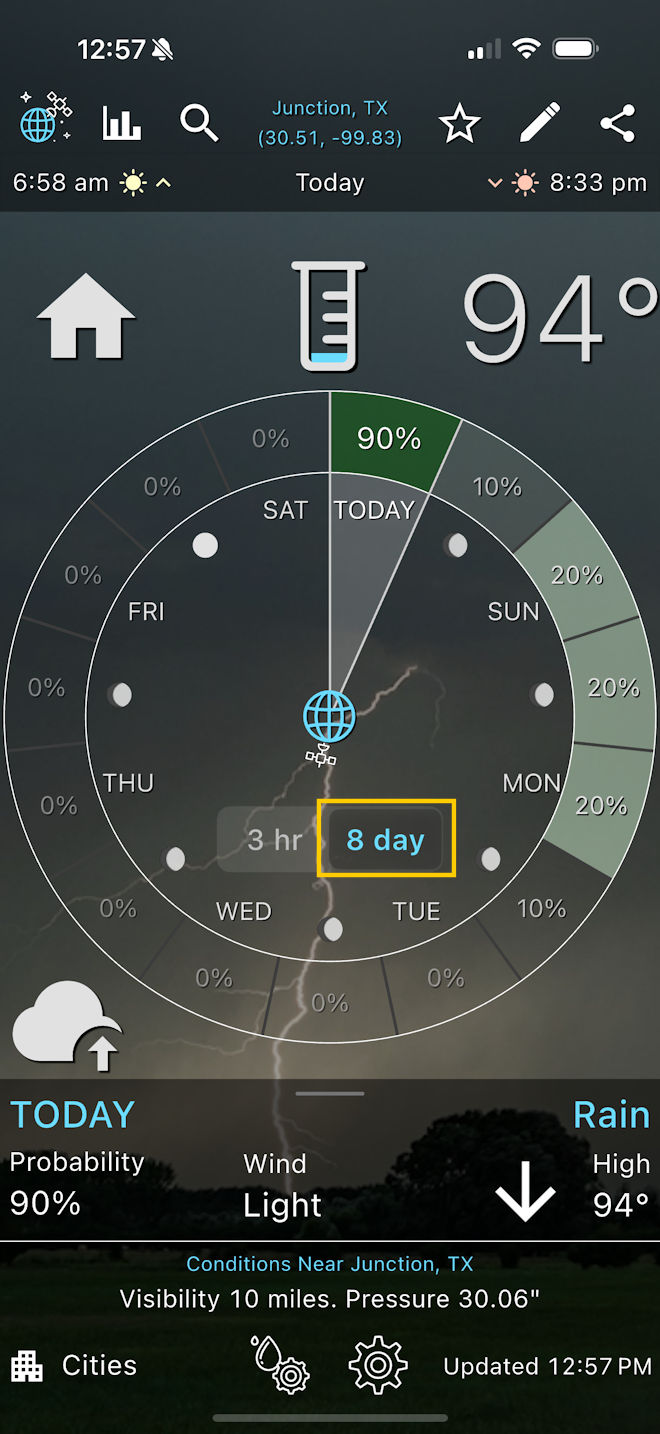 IF DRY:
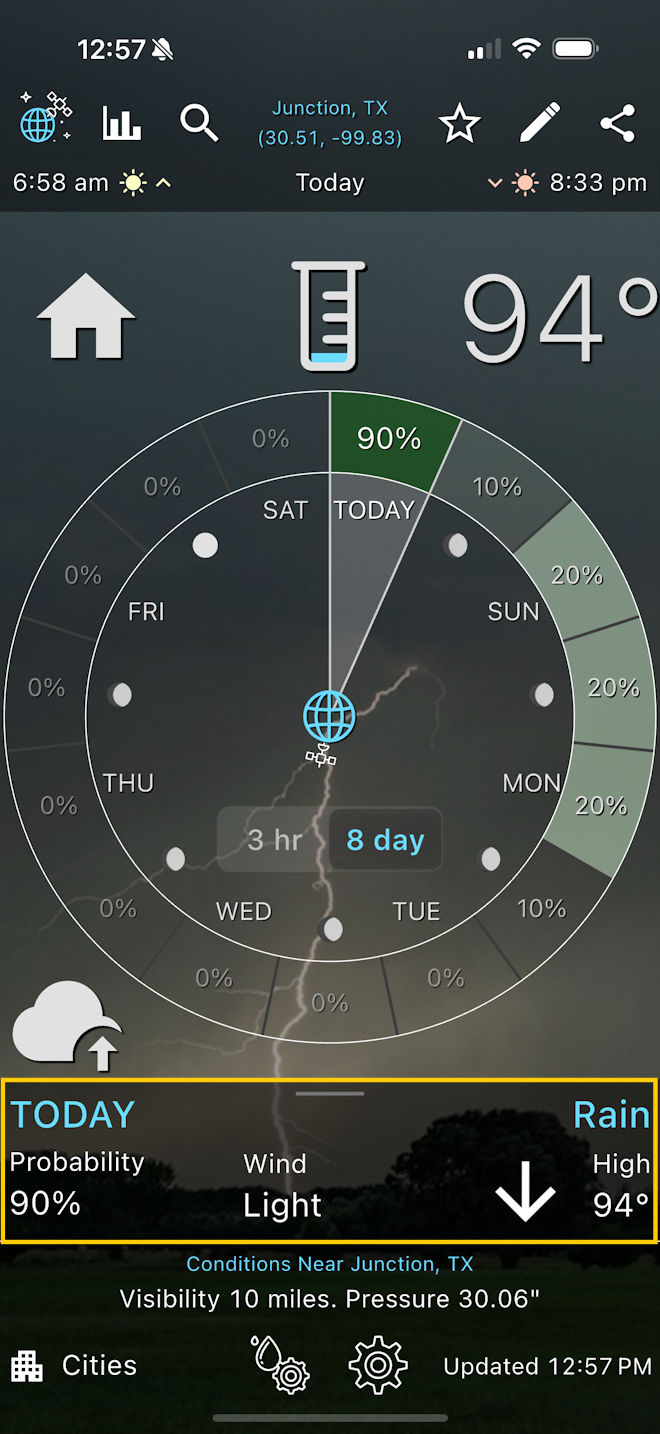 1. Tap the Snippet or Button
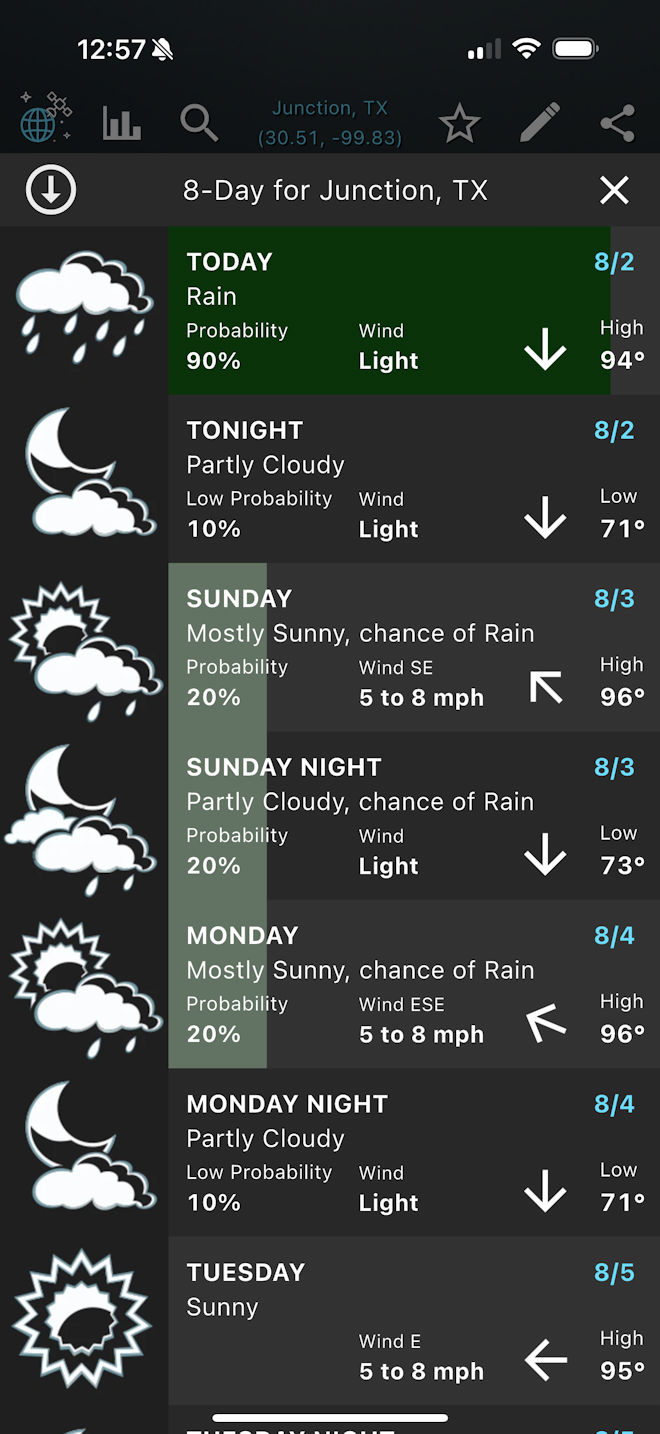 2. See full 8-Day Outlook
 Full Map Interface
 Tap bottom-left to change layers
 1. Access the Cities menu
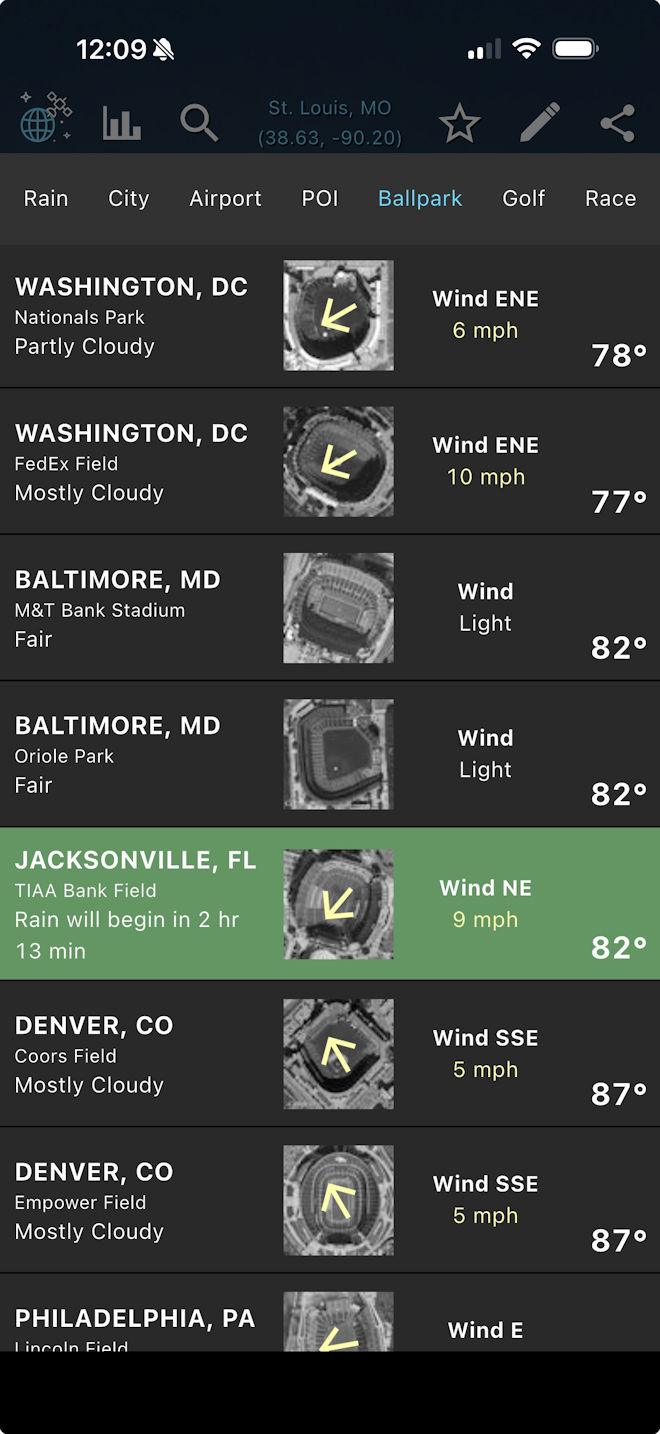 2. Select your location
